Categories
Limit Tests

Determination of Optical Rotation and Specific Optical Rotation

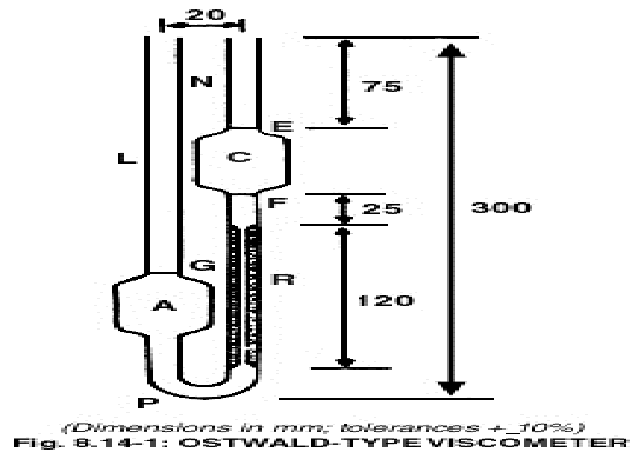
Title: Determination of Optical Rotation and Specific Optical Rotation


  1. Objective: To determine the Optical Rotation and Specific Optical Rotation of the solutions and solvents.


  1. Principle: There are 2 types of plane polarized light [PPL], 1) Right circularly plane polarized light (RCPL), 2) Left circularly plane polarized light (LCPL). They are equal and opposite direction. When a PPL is pass through the optical active compound, due to its circular birefringence results unequal rate of propagation of left and right circularly polarized rays. This unequal rate of propagation of both RCPL and LCPL deviates the PPL from its original direction and it is called to be ‘Optical Rotation’.

Optical Activity: The compounds which are having the ability to rotate the plane of polarised light are called optically active compounds .They rotate plane of polarized light due to their chirality (asymmetric character) this phenomenon is known as ‘optical activity’.  When a ray of monochromatic polarized light strikes a solution, several phenomenon’s occurs like:-1. Reflection on the surface. 2. Refraction. 3. Rotation of plane polarization 4. Absorption.


3. Procedure:

  • Definitions:
  • Optical Rotation: The optical rotation of a substance is the angle through which the plane of polarisation is rotated when polarised light passes through the substance, if liquid, or a solution of the substance. Substances are described as dextro-rotatory or laevo-rotatory according to whether, [α]D25 the plane of polarisation is rotated clockwise or anticlockwise, respectively as determined by viewing towards the light source. Dextro-rotation is designated (+) and laevo-rotation is designated (-).
  • Specific Optical Rotation of Liquid: The specific optical rotation,[α]D25 of a liquid substance is the angle of rotation α , of the plane of polarisation at the wavelength of the D line of sodium (l = 589.3 nm) measured at 25° , unless otherwise specified, calculated with reference to a 1-dm thick layer of the liquid, and divided by the specific gravity at  250
  • Specific Optical Rotation of Solid: The specific optical rotation, [α]D25,of a solid substance is the angle of rotation, α , of the plane of polarisation at the wavelength of the D line of sodium (l = 589.3 nm) measured at 250C, unless otherwise specified, calculated with reference to a 1-dm thick layer of a solution containing 1 g of the substance per ml. The specific optical rotation of a solid is always expressed with reference to a given solvent and concentration.


  • Apparatus:

A commercial instrument constructed for use with a sodium lamp and capable of giving readings to the nearest 0.02° is suitable for most purposes. For certain applications, the use of a photoelectric polarimeter capable of taking measurement at the specific wavelengths may be necessary.

The accuracy and precision of optical rotation measurements can be increased if the following precautions are taken.

  1. a) The instrument must be in a good condition. The optical elements must be very clean and in exact alignment. The match point should be close to the normal zero mark.

(b) The light source should be properly aligned with respect to the optical bench. It should be supplemented by a filtering system capable of isolating the D line from sodium light.

(c) Specific attention should be paid to temperature control of the solution and of the polarimeter.

(d) Differences between the initial readings or between observed and corrected optical rotation, calculated, as either specific optical rotation or optical rotation, should not be more than one-fourth of the range specified in the monograph for the substance.

(e) Polarimeter tubes should be filled in such a way as to avoid air bubbles. Particular care is necessary for semi-micro or micro tubes.

(f) For tubes with removable end plates fitted with gaskets and caps, tighten the end-plates only enough to ensure a leak-proof seal between the end plate and the body of the tube.

(g) For substances with low rotatory power, the end-plates should be loosened and tightened again after each reading, in the measurement of both the rotation and the zero point.

(h) Liquids and solutions of solids must be clear.


  • Calibration:

The apparatus may be checked by using a solution of previously dried sucrose and measuring the optical rotation in a 2-dm tube at 25° and using the concentrations indicated in Table 1.

Table 1

Concentration (g/100 ml) Angle of Rotation (+)  at 25o
10.0 13.33
20.0 26.61
30.0 39.86
40.0 53.06


  • Method:

The optical rotation, unless otherwise specified, is measured at the wavelength of the D line of sodium (l = 589.3 nm) at 25°, on a layer 1 dm thick. It is expressed in degrees.

  • For Solids:

Weigh accurately a suitable quantity of the substance being examined to obtain the solution of the strength specified in the individual monograph and transfer to a volumetric flask by means of water or other solvent, if specified. If a solvent is used, reserve a portion of it for the blank determination. Unless otherwise specified, adjust the contents of the flask to 25°C by suspending the flask in a constant-temperature bath. Make up to volume with the solvent at 25°C and mix well. Transfer the solution to the polarimeter tube within 30 minutes from the time the substance was dissolved and during this time interval maintain the solution at 25°C. Determine the zero point of the polarimeter and then make five readings of the observed rotation of the test solution at 25°C. Take an equal number of readings in the same tube with the solvent in place of the test solution. The zero correction is the average of the blank readings, and is subtracted from the average observed rotation if the two figures are of the same sign or added if they are opposite in sign to obtain the corrected observed rotation.

  • For Liquids:

Unless otherwise specified, adjust the temperature of the substance being examined to 25°C, transfer to a polarimeter tube and proceed as described for solids, beginning at the words “Determine the zero point…”


  • Calculations:

Calculate the specific optical rotation using the following formulae, dextro-rotation and laevo-rotation being designated by (+) and (-) respectively.

For liquids [α]D25 = α/ld 25

For solids [α]D25 = 100α /lc

Where α = corrected observed rotation, in degrees, at 25°C.

D = D line of sodium light (l = 589.3 nm)

l  = length of the polarimeter tube in dm

d25 25 = specific gravity of the liquid or solution at 25°

c  = concentration of the substance in % w/v


NOTE: The requirement for optical rotation and specific optical rotation in the Pharmacopoeia apply to a dried, anhydrous or solvent-free material in all those monographs in which standards for loss on drying, water, or solvent content respectively are given. In calculating the result, the loss on drying, water or solvent content determined by the method specified in the monograph is taken into account.


“End of Document”

Categories
Limit Tests

Determination of Weight Per Millilitre and Relative Density (Specific Gravity)

Title: Determination of Weight Per Millilitre and Relative Density (Specific Gravity)


  1. Objective: To determine the Weight per ml and Relative Density of the solutions and solvents.


  1. Principle: The Weight per millilitre is determined by dividing fill weight of test liquid in gram by the capacity of pycnometer expressed in ml at the specified temperature.

3.       Procedure:

3.1        Definitions:

  • Specific Gravity: It is based on the ratio of the weight of a liquid in air at 25oC to that of an equal volume of water at the same temperature. Where a temperature is specified in the individual monograph, the Specific Gravity is the ratio of the weight of a liquid in air at specified temperature to that of an equal volume of water at the same temperature.
  • Relative Density: It is defined as the mass of a unit volume of the substance at 25oC expressed in g, of the quantity of liquid that fills a pycnometer at the specified temperature to that of an equal volume of water at the same temperature.


  • Method: (Weight per ml)

Select a thoroughly clean and dry pycnometer that previously has been calibrated by determining its weight and the weight of recently boiled and cooled water contained in it at 25°C. Adjust the temperature of the test liquid to about 20°C and fill the pycnometer with it. Adjust the temperature of the filled pycnometer to 25°C, remove any excess liquid, and weigh. When the monograph specifies a temperature different from 25°C, filled pycnometers must be brought to the temperature of the balance before they are weighed. Subtract the tare weight of the pycnometer from the filled weight of the pycnometer.

Determine the weight per ml by dividing the weight of test liquid in gram by the capacity of pycnometer expressed in ml at the specified temperature.


  • Method: (Relative Density)

Proceed as described under weight per millilitre method. Divide the weight of the substance in the pycnometer by the weight of water contained in the pycnometer, both determined at 25°C, unless otherwise specified in the individual monograph.


“End of Document”

Categories
Limit Tests

Determination of Conductivity

Title: Determination of Conductivity


  1. Objective: To determine the Conductivity of the solution.


  1. Principle: The electrical conductivityof a solution of an electrolyte is measured by determining the resistance of the solution between two flat or cylindrical electrodes separated by a fixed distance.

The current I (in amperes) flowing in a conductor is directly proportional to the applied electromotive force E (in volts) and inversely proportional to the resistance R (in ohms) of the conductor.

Current (I) = E/R


3. Procedure:

  • Definitions:
  • Conductivity: Conductivity of the solution (K) is the reciprocal of resistivity (p) which is defined as the quotient of the electric field and the density of the current (flowing in the conducting solution). The unit of conductivity in the International System is the Siemens per metre (Sm-1). Generally used in expressing the electrical conductivity is siemens per centimetre (Scm-1) or microsiemens per centimetre (μScm-1).


  • Apparatus:

The apparatus used is a Conductivity Meter that measures the resistance of the column of liquid between the electrodes of the immersed conductivity cell. For operation and calibration of Conductivity Meter refer respective SOP.


  • Method:

After the Conductivity Meter has been calibrated with a certified reference material solution, rinse the conductivity cell several times with purified water and atleast twice with aqueous solution under examination. Carry out the successive measurements as described in the individual monograph.


  • Procedure for Water Conductivity:

A three stage method of testing is described for Purified Water and Water for Injection Testing. Testing at first stage is usually adequate for Purified Water.


Stage 1: It is intended for online measurement or may be performed offline in a suitable container.

  1. Measure the temperature of the water and the conductivity of the water using a non temperature-compensated conductivity reading.
  2. Using theTable 1—Temperature and Conductivity Requirements table, find the temperature value that is not greater than the measured temperature, and read the corresponding conductivity value that becomes the limit.
  3. If the measured conductivity is not greater than the table value, the water meets the requirements of the test for conductivity. If the conductivity is higher than the table value, proceed with Stage 2.

Table 1—Temperature and Conductivity Requirements
(for non temperature-compensated conductivity reading only)

Temperature(°) Purified Water Conductivity (µS/cm) Water for Injections and sterile water for Inhalation Conductivity (µS/cm)
0 2.4 0.6
5 0.8
10 3.6 0.9
15 1.0
20 4.3 1.1
25 5.1 1.3
30 5.4 1.4
35 2.4 1.5
40 1.7 6.5
45 1.8
50 1.9 7.1
55 2.1
60 8.1 2.2
65 2.4
70 9.1 2.5
75 9.7 2.7
Temperature(°) Purified Water Conductivity (µS/cm) Water for Injections and sterile water for Inhalation Conductivity (µS/cm)
80 9.7 2.7
85 2.7
90 9.7 2.7
95 2.9
100 10.2 3.1


Stage 2:

  1. Transfer a sufficient amount of water (100 ml or more) to a suitable container, and stir the test specimen. Adjust the temperature at 25 ± 1 if necessary, begin vigorously agitating the test specimen while periodically observing the conductivity. When the change in conductivity (due to uptake of atmospheric carbon dioxide) is less than a net of 0.1 µS/cm per 5 minutes, note the conductivity.


  1. If the conductivity is not greater than 2.1 µS/cm, the water meets the requirements of the test for conductivity. If the conductivity is greater than 2.1 µS/cm, proceed with Stage 3.

Stage 3:

  1. Perform this test within approximately 5 minutes of the conductivity determination in Step 5, while maintaining the sample temperature at 25 ± 1. Add a recently prepared saturated Potassium Chloride solution to the same water sample (0.3 ml per 100 ml of the test specimen), and determine the pH to the nearest 0.1 pH unit.


  1. Referring to the Stage 3—pH and Conductivity Requirements table 2, determine the conductivity limit at the measured pH value. If the measured conductivity in Step 4 is not greater than the conductivity requirements for the pH determined in Step 6, the water meets the requirements of the test for conductivity. If either the measured conductivity is greater than this value or the pH is outside the range of 5.0 to 7.0, the water does not meet the requirements of the test for conductivity.

                                              Table 2

pH Conductivity Requirement (µS/cm)
5.0 4.7
5.1 4.1
5.2 3.6
5.3 3.3
5.4 3.0
5.5 2.8
5.6 2.6
5.7 2.5
5.8 2.4
5.9 2.4
6.0 2.4
6.1 2.4
6.2 2.5
6.3 2.4
6.4 2.2
pH Conductivity Requirement (µS/cm)
6.5 2.2
6.6 2.2
6.7 2.6
6.8 3.1
6.9 3.8
7.0 4.6


“End of Document”

Categories
Limit Tests

Determination of Viscosity

Title: Determination of Viscosity


  1. Objective: To determine the Viscosity of liquids.


  1. Principle: The viscosity of a fluid is a measure of its resistance to gradual deformation by shear stress or tensile stress.The dynamic (shear) viscosity of a fluid expresses its resistance to shearing flows, where adjacent layers move parallel to each other with different speeds.


3. Procedure:

  • Definitions:
  • Shear thickening:Liquids whose viscosity increases with the rate of shear strain.
  • Shear thinning:Liquids whose viscosity decreases with the rate of shear strain.
  • Thixotropic:Liquids that become less viscous over time when shaken, agitated, or otherwise stressed.
  • Rheopectic:Liquids that become more viscous over time when shaken, agitated, or otherwise stressed.
  • Bingham plasticsPlastics that behave as a solid at low stresses but flow as a viscous fluid at high stresses.


  • Method:

The determination of viscosity of newtonian liquids is carried out by means of a capillary viscometer, unless otherwise specified; Methods A and B described below are recommended. For non-newtonian liquids Method C using the rotating viscometer may be used.

For measurement of viscosity, the temperature of the substance being measured must be accurately controlled, since small temperature changes may lead to marked changes in viscosity. For usual pharmaceutical purposes, the temperature should be maintained to within ± 0.1°.

  • Method A(Using Ostwald-type Viscometer)

Apparatus


The apparatus consists of a glass U-tube viscometer (see Fig. 1) made of clear borosilicate glass and constructed in accordance with the dimensions shown in the figure and in Table 1. – U-Tube Viscometer – Dimensions.

Table 1U-Tube Viscometer – Dimensions

Size National viscometer constant Kinematic
Viscosity
range
Inside
diameter
of tube
Outside
diameter of
tubes*
Volume
of bulb
Vertical 

distance

Outside
diameter
of bulbs
R L PN C F to G A & C
m²s-² mm²s-1 mm (±2%) mm mm ml (±5%) mm mm
A** 0.003 0.9 to 3 0.50 8 to 9 6 to 7 5. 0 91 ± 4 21 to 23
B 0.01 2.0 to 10 0.71 8 to 9 6 to 7 5.0 87± 4 21 to 23
C 0.03 6 to 30 0.88 8 to 9 6 to 7 5.0 83 ± 4 21 to 23
D 0.1 20 to 100 1.40 9 to 10 7 to 8 10.0 78 ± 4 25 to 27
E 0.3 60 to 300 2.00 9 to 10 7 to 8 10.0 73± 4 25 to 27
F 1.0 200 to 1000 2.50 9 to 10 7 to 8 10.0 70 ± 4 25 to 27
G 3.0 600 to 3000 4.00 10 to 11 9 to 10 20.0 60 ± 3 32 to 35
H 10.0 2000 to 10,000 6.10 10 to 11 9 to 10 20.0 50 ± 3 32 to 35

Use 1 to 1.25 mm wall tubing for N.P and L
** 300 s minimum flow time; 200 s minimum flow time for all other sizes.


Procedure:

Fill the viscometer, previously washed and completely dried, with the liquid being examined through tube L to slightly above the mark G, using a long pipette to minimise wetting the tube above the mark. Place the tube vertically in a water-bath maintained at the temperature indicated in the monograph and allow to stand for not less than 30 minutes to allow the temperature to reach equilibrium. Adjust the volume of the liquid so that the bottom of the meniscus settles at the mark G. Suck or blow the liquid to a point about 5 mm above the mark E. After releasing pressure or suction, measure the time taken for the bottom of the meniscus to fall from the top edge of mark E to the top edge of mark F.

Calculate, as required, either the kinematic viscosity (v) in square millimeters per seconds (mm² s-1) from the expression: v = Kt

or the dynamic viscosity (n) in millipascal seconds (mPa s) from the expression

n = KPt,

where, t = time in seconds for the meniscus to fall from E to F,

P = mass/volume (g cm-3) obtained by multiplying the relative density, of the liquid

                               being examined by 0.998203.

The constant (K) of the instrument is determined on a liquid of known viscosity.


  • Method B (Using the Suspended-level viscometer)

Apparatus

The apparatus consists of a glass suspended-level viscometer (see Fig. 8.14-2) made of clear borosilicates glass and constructed in accordance with the dimension shown in the figure and in Table 2.

Table-2 Suspended –level viscometer—dimensions

Size National viscometer constant

m²s-²

Kinemactic
Viscosity
range
mm²s-1
Inside
diameter
of tube R
mm (±2%)
Volume
of bulb
Cmm
Inside diameter of tube N

mm

1* 0.01 3.5 to 10 0.64 5.6 2.8 to 3.2
1A 0.03 6 to 30 0.84 5.6 2.8 to 3.2
2 0.1 20 to 100 1.15 5.6 2.8 to 3.2
2A 0.3 60 to 300 1.51 5.6 2.8 to 3.2
3 1.0 200 to 1100 2.06 5.6 3.7 to 4.3
3A 3.0 600 to 3000 2.74 5.6 4.6 to 5.4
4 10.0 2000 to 10,000 3.70 5.6 4.6 to 5.4
4A 30.0 6000 to 30,000 4.97 5.6 5.6 to 6.4
5 100.0 20,000 to 100,000 6.76 5.6 6.8 to 7.5

* 350 s minimum flow times; 200 s minimum flow time for all other sizes.


Procedure:

Fill the viscometer through tube L with a sufficient quantity of the liquid being examined to ensure that bulb A is satisfactorily filled without blocking the ventilation tube M. After the tube has been placed vertically in a bath maintained at the specified temperature allow it to stand for not less than 30 minutes to allow the temperature to reach equilibrium, close tube M and apply suction to tube N until the liquid reaches a level about 5 mm above mark E. Hold the liquid at this level by closing tube N and open tube M. when the liquid is clear of the capillary end of tube N and the lower end of tube M, open tube N. Measure the time taken, to the nearest 0.2 of a second, for the bottom of the meniscus to fall from the top edge of mark E to the top edge of mark F.

If the end of tube M becomes blocked by the liquid at any time while the flow time is being measured, the determination must be repeated.

The result is not valid unless two consecutive readings do not differ by more than 1%. The average of not fewer than three readings gives the flow time of the liquid being examined.

Calculate the kinematic viscosity (v) or the dynamic viscosity (h) as given under Method A.

  • Method C: (Using the rotating Viscometer)

The rotating viscometer measures the shearing forces in a liquid medium placed between two coaxial cylinders one of which is driven by a motor and the other is caused to revolve by the rotation of the first. Under these conditions, the viscosity becomes a measurement of the angle of deflection of the cylinder caused to revolve, expressed in newton metres.

The principle of the method is to measure the force acting on a rotor (torque) when it rotates at a constant angular velocity (rotational speed) in a liquid. Rotating viscometers are used for measuring the viscosity of Newtonian (shear-independent velocity) or non-Newtonian liquids (shear dependent viscosity or apparent viscosity). Rotating viscometers can be divided into 2 groups, namely absolute and relative viscometers. In absolute viscometers the flow in the measuring geometry is well defined. The measurements result in absolute viscosity values, which can be compared with any other absolute values. The relative viscometers, the flow in the measuring geometry is not defined. The measurements results in relative viscosity values, which cannot be compared with absolute values or other relative values if not determined by the same relative viscometer method.

Different measuring systems are available for given viscosity range as well as several rotational speeds.


Procedure: 

Operate the Rotating Viscometer in accordance with the manufacturer’s instruction and carry out the determination of viscosity of the liquid being examined, at the temperature and angular velocity or shear rate specified in the individual monograph.

If it is not possible to obtain the indicated shear rate exactly, use shear rates slightly higher and slightly lower than the indicated value and interpolate.

Calculate the dynamic viscosity (h) is pascal seconds (Pa s) from the expression

=KL/w,

where L = the angular momentum in newton meters,

w = the angular speed in radians per second.

The constant (K) of the instrument is determined using a liquid of known viscosity or by reference too tables supplied by the instrument manufacturer.


“End of Document”

Categories
Limit Tests

Determination of Freezing Point

Title: Determination of Freezing Point


  1. Objective: To determine the the freezing point of the sample.


  1. Principle:
  • The freezing point is the temperature at which the liquid and solid phases of the substance are in equilibrium.
  • The freezing point is the maximum temperature occurring during the solidification of a super cooled liquid.


  1. Procedure:
  • Apparatus:

The apparatus Figure 1 consists of a test-tube about 25 mm in diameter and 150 mm long placed inside a test-tube about 40 mm in diameter and 160 mm long. The inner tube is closed by a stopper which carries a thermometer about 175 mm long and graduated in 0.2° fixed so that the bulb is about 15 mm above the bottom of the tube. The stopper has a hole allowing the passage of the  stem of a stirrer made from a glass rod or other suitable material formed at one end  into a loop of about 18 mm overall diameter at right angles to the rod. The inner tube with its jacket is supported centrally in a 1 litre beaker containing a suitable cooling liquid to within 20 mm of the top. A thermometer is supported in the cooling bath.


  • Method:

Place a quantity of the substance under examination in the inner tube such that the thermometer bulb is well covered and determine the approximate freezing point by cooling rapidly. Place the inner tube in a bath about 5°C above the approximate freezing point until all but the last traces of crystals are melted. Fill the beaker with water or a saturated solution of sodium chloride, at a temperature about 5°C lower than the expected freezing point, assemble the apparatus, ensuring that some seed crystals are present, and stir thoroughly until solidification takes place. The highest temperature observed during solidification of the substance is regarded as the freezing point of the substance.


“End of Document”

Categories
Limit Tests

Determination of pH

Title: Determination of pH


  1. Objective: To determine the pH of samples to represents the acidity or alkalinity of an aqueous solution of the sample.


  1. Principle: The acidic or basic property of substances is measured in terms of pH. It is a measurement of the hydrogen ion concentration. pH is defined as the negative logarithm (base 10) of hydrogen ion concentration.

If the hydrogen ion concentration is very high, the pH value is very low. This is determined using a scale ranging from 0-14 called the pH scale. Substances with pH lower than 7 are acidic, those with pH equal to 7 are neutral and those with pH greater than 7 are basic in nature.

 3. Procedure:

The pH determination is carried out at a temperature of 25°C ± 2°C, unless otherwise specified in the individual monograph.

  • Apparatus:

The pH value of a solution is determined potentiometrically by means of a glass electrode, a reference electrode and a pH Meter either of the digital or analogue type.

Operate the pH meter according to the manufacturer’s instructions. Calibrate the apparatus using buffer solution D as the primary standard, adjusting the meter to read the appropriate pH value given in Table 1, corresponding to the temperature of the solution. To set the scale, use a second reference buffer solution, either buffer solution A, buffer solution E or buffer solution G or buffer solution I and carry out a check with a third buffer solution of intermediate pH . The pH reading of the intermediate solution must not differ by more than 0.05 from the corresponding value indicated in Table 1.


  • Reference Buffer Solutions:

Note:  Prepare the following buffer solutions using Purified water. Buffer solutions should be stored in bottles made of alkali-free glass, and must not be used later than 3 month after preparation or avail readymade buffer solution from the chemical supplier with COA.

Buffer A: A 1.271% w/v solution of Potassium Tetraoxalate. (Dissolve 1.271 g of Potassium Tetraoxalate in sufficient water and dilute to 100 ml with water.)


Buffer B: A freshly prepared solution, saturated at 25°C, of Potassium Dihydrogen Tartrate. Dissolve Potassium Dihydrogen Tartrate in about 50 ml of water until it no longer dissolves creates saturated solution of Potassium Dihydrogen Tartrate.


Buffer C: A freshly prepared 1.151% w/v solution of Potassium Dihydrogen Citrate. (Dissolve 1.151 g of Potassium Dihydrogen Citrate in sufficient water and dilute to 100 ml with water.)


Buffer D: A 1.021 % w/v solution of Potassium Hydrogen Phthalate, previously dried at 110°C to      135°C for 2 hours. (Dissolve 1.021 g of Potassium Hydrogen Phthalate in sufficient water and dilute to 100 ml with water.)

Buffer E: A mixture containing 0.348% w/v of Potassium Dihydrogen Phosphate (Dissolve 0.348 g of Potassium Dihydrogen Phosphate in sufficient water and dilute to 100 ml with water.) and 0.355% w/v of anhydrous Disodium Hydrogen Phosphate (Dissolve 0.355 g of anhydrous Disodium Hydrogen Phosphate in sufficient water and dilute to 100 ml with water.), both previously dried at 110°C to 130°C for 2 hours.


Buffer F: A mixture containing 0.1184% w/v of Potassium Dihydrogen Phosphate (Dissolve 0.1184 g of Potassium Dihydrogen Phosphate in sufficient water and dilute to 100 ml with water.) and 0.4303% w/v of anhydrous Disodium Hydrogen Phosphate (Dissolve 0.4303 g of anhydrous Disodium Hydrogen Phosphate in sufficient water and dilute to 100 ml with water.), both previously dried at 110°C to 130°C for 2 hours.


Buffer G: A 0.3814% w/v solution of Sodium Tetraborate (Dissolve 0.3814 g of Sodium Tetraborate in sufficient water and dilute to 100 ml with water.) stored protected from carbon dioxide.


Buffer H: A mixture containing 0.2649% w/v of Sodium Carbonate (Dissolve 0.2649 g of Sodium Carbonate in sufficient water and dilute to 100 ml with water.) and 0.210% w/v of Sodium Bicarbonate (Dissolve 0.210 g of Sodium Bicarbonate in sufficient water and dilute to 100 ml with water.).

Buffer I: Shake excess of Calcium Hydroxide with Purified water and decant at 25°C.

  • Method:

Immerse the electrodes in the solution being examined and measure the pH at the same temperature as for the standard solutions. At the end of a set of measurements, record the pH of the solution used to standardise the meter and electrodes. If the difference between this reading and the original value is greater than 0.05, the set of measurements must be repeated.

When measuring pH values above 10.0 ensure that the glass electrode is suitable for use under alkaline conditions and apply any correction that is necessary.

Table 1 – pH of Reference buffer solutions at various temperature

Temperature

in °C

Reference Buffer Solution
A B C D E F G H I
      15

20

25

30

35

1.67

1.68

1.68

1.68

1.69

3.56

3.55

3.55

3.80

3.79

3.78

3.77

3.76

4.00

4.00

4.01

4.02

4.02

6.90

6.88

6.87

6.85

6.84

7.45

7.43

7.41

7.40

7.39

9.28

9.23

9.18

9.14

9.10

10.12

10.06

10.01

9.97

9.93

12.81

12.63

12.45

12.29

12.13


“End of Document”

Categories
Limit Tests

Determination of Jelly Strength

Title: Determination of Jelly Strength  


  1. Objective: To determine the Jelly Strength of Gelatin to provide information on the purity of the substance.


  1. Principle: Determination of the force (in grams) which has to be applied by means of a cylindrical piston, 12.7 mm in diameter to the free surface of 6.67 % w/w matured at 10° gelatin gel in order to produce a depression of 4 mm.


3. Procedure:

  • Apparatus:

A gelometer consisting of a cylindrical piston 12.6 to 12.8 mm in diameter with a plane pressure surface with a rounded edge 0.5 mm in radius attached to a device whereby the load exerted by the piston can be increased at a constant rate of 40 g per second and the vertical movement of the piston can be stopped within 0.025 seconds when it has descended 3.9 to 4.1 mm.


  • Method:

Place 7.5 g of the substance being examined in a bottle, 58 to 60 mm in internal diameter and 85 mm high, add 105 ml of water, cover the bottle with a watch glass and allow to stand for 3 hours. Heat in a water-bath at 65°C for 15 minutes, stirring gently with a glass rod ensuring that the solution is uniform and that any condensed water on the inner walls of the bottle is incorporated. Allow to cool at room temperature for 15 minutes, transfer to a water-bath maintained at 9.9°C to 10.1°C and ensure that the base of the bottle is horizontal. Close the bottle with a rubber stopper and allow to stand for 16 to 18 hours. Immediately transfer the bottle to the gelometer and adjust the height of the bottle so that the piston just comes into contact with the surface of the gel without exerting any pressure. Increase the load on the piston at a rate of 40 g per second until it has descended 3.9 to 4.1 mm. The load, measured within a precision of ± 0.5 g, exerted by the piston at that moment represents the jelly strength. Carry out five determinations and use the mean value.


“End of Document”

Categories
Limit Tests

Determination of Melting Range or Temperature

Title: Determination of Melting Range or Temperature


  1. Objective: To determine the Melting Point of a solid to provide information on the purity of the substance.


  1. Principle: Melting point of a solid indicates the strength of the force of attraction between the particles of the solid. On heating a solid, its molecules absorb energy in the form of heat and their kinetic energy increases.

As the kinetic energy increases, the temperature of the solid increases. As a result, the force of attraction between the molecules decreases and the molecules become more and more separated.  This increases the potential energy of the molecule and the particles leave their fixed positions and start moving more freely.

At a particular temperature, the separation of the molecules increases by a large amount and the solid melts and converts into liquid. This particular temperature is the melting point of that solid.


3. Procedure:

  • Precautions:
  • For precise result maintain a heating rate of 1 to 2 degrees per minute.
  • For unknown sample, run the first sample at a high rate of heating to get an approximate melting point range. Then repeat the procedure but slow down the rate of heating as you approach the expected melting point.
  • Do not fill sample in the capillary too little or too large which can lead to errors.
  • Generally fill 4 to 6 mm in the bottom of a capillary tube. The sample should be firmly packed in the bottom of the tube to ensure efficient heat transfer.


  • Method I: Use Method I unless otherwise specified in the individual monograph.
  • Apparatus:
  1. A glass heating vessel of suitable construction and capacity containing one of the following or any other suitable bath liquid to a height of not less than 14 cm.
  2. Water for temperature up to 60°C.
  3. Glycerin for temperature up to 150°C.
  4. Liquid paraffin of sufficiently high boiling range for temperature up to 250°C.
  5. Sesame oil or a suitable grade of silicone oil for temperature up to 300°C.
  6. A suitable stirring device capable of rapidly mixing the liquids.
  7. An accurately standardised thermometer suitable for the substance being examined. The thermometer must be positioned in the bath liquid to its specified immersion depth and yet leave the bulb about 2 cm above the bottom of the bath.
  8. Thin-walled capillary glass tubes of hard glass, closed at one end, about 12 cm long, with a thickness of 0.2 to 0.3 mm and an internal diameter of 0.8 to 1.1 mm. The tubes should preferably be kept sealed at both ends and cut as required. A suitable magnifying glass may be used for observation of melting in the capillary tube.
  9. A source of heat (open flame or electric heater).


  • Method:

Reduce the substance to a very fine powder and, unless otherwise directed, dry it at a temperature considerably below its melting temperature of at a pressure of 1.5 to 2.5 kPa over self-indicating silica gel for 24 hours. Introduce into a capillary glass tube, a sufficient quantity of the dry powder to form a compact column 4 to 6 mm height. Heat the bath until the temperature is about 10°C below the expected melting temperature. Remove the thermometer and quickly attach the capillary tube to the thermometer by wetting both with a drop of the liquid of the bath or otherwise and adjust its height so that the closed end of the capillary is near the middle of the thermometer bulb. Place the thermometer and continue the heating, with constant stirring, sufficiently to cause the temperature to rise at a rate of about 1°C per minute. Continue the heating and note the temperature at which the column of the sample collapse definitely against the side of the tube at any point, (melting point of the sample) when melting may be considered to have begun and note also the temperature at which the sample becomes liquid throughout as seen by the formation of a definite meniscus. (sample collapse temperature to definite meniscus formation temperature is called melting range ). The two temperatures should fall within the limits of the melting range.


“End of Document”

Categories
Limit Tests

Determination of Residue on Ignition

Title: Determination of Residue on Ignition


The Residue on Ignition / Sulphated Ash test uses a procedure to measure the amount of residual substance not volatilized from a sample when the sample is ignited in the presence of sulfuric acid according to the procedure described below. This test is usually used for determining the content of inorganic impurities in an organic substance.

Procedure:— 

Ignite a suitable crucible (for example, silica, platinum, quartz, or porcelain) at 600 ± 50  for 30 minutes, cool the crucible in a desiccator (silica gel or other suitable desiccant), and weigh it accurately. Weigh accurately  1 to 2 g of the substance, or  the amount specified in the individual monograph, in the crucible.


Moisten the sample with a small amount (usually 1 mL) of sulfuric acid, then heat gently at a temperature as low as practicable until the sample is thoroughly charred. Cool; then, unless otherwise directed in the individual monograph,  moisten the residue with a small amount (usually 1 mL) of sulfuric acid; heat gently until white fumes are no longer evolved; and ignite at 600 ± 50 ,  unless another temperature is specified in the individual monograph,  until the residue is completely incinerated. Ensure that flames are not produced at any time during the procedure. Cool the crucible in a desiccator (silica gel or other suitable desiccant), weigh accurately, and calculate the percentage of residue.


Unless otherwise specified, if the amount of the residue so obtained exceeds the limit specified in the individual monograph, repeat the moistening with sulfuric acid, heating and igniting as before, using a 30-minute ignition period, until two consecutive weighings of the residue do not differ by more than 0.5 mg or until the percentage of residue complies with the limit in the individual monograph.

Conduct the ignition in a well-ventilated hood, but protected from air currents, and at as low a temperature as is possible to effect the complete combustion of the carbon. A muffle furnace may be used, if desired, and its use is recommended for the final ignition at               600 ± 50ºC .


“End of Document”

Categories
Limit Tests

Limit Test for Selenium

Title: Limit Test for Selenium


Stock Solution— Dissolve 40.0 mg of metallic selenium in 100 mL of dilute nitric acid (1 in 2) in a 1000-mL volumetric flask, warming gently on a steam bath if necessary to effect solution, add water to volume, and mix. Pipet 5 mL of this solution into a 200-mL volumetric flask, add water to volume, and mix. Each mL of the resulting solution contains the equivalent of 1 µg of selenium (Se).

Diaminonaphthalene Solution— Dissolve 100 mg of 2,3-diaminonaphthalene and 500 mg of hydroxylamine hydrochloride in 0.1 N hydrochloric acid to make 100 mL. Prepare this solution fresh on the day of use.

Standard Solution— Pipet 6 mL of Stock Solution into a 150-mL beaker, and add 25 mL of dilute nitric acid (1 in 30) and 25 mL of water.

Test Solution— Clean combustion of the test material is an important factor in conducting the test. For compounds that burn poorly and produce soot, the addition of magnesium oxide usually results in more thorough combustion and reduces soot formation. Where the need to add magnesium oxide has been identified, it is specified in the individual monograph. Using a 1000-mL combustion flask and using 25 mL of dilute nitric acid (1 in 30) as the absorbing liquid, proceed as directed under Oxygen Flask Combustion , using a test specimen weighing 100 to 200 mg, unless directed otherwise in the individual monograph. Upon completion of the combustion, place a few mL of water in the cup, loosen the stopper, and rinse the stopper, the specimen holder, and the sides of the flask with about 10 mL of water. Transfer the solution with the aid of about 20 mL of water to a 150-mL beaker, and heat gently to the boiling temperature. Boil for 10 minutes, and allow the solution to cool to room temperature.

Procedure— Treat the Standard Solution, the Test Solution, and the reagent blank consisting of 25 mL of dilute nitric acid (1 in 30) and 25 mL of water, concomitantly and in parallel, as follows. Add ammonium hydroxide solution (1 in 2) to adjust to a pH of 2.0 ± 0.2. Dilute with water to 60 mL, and transfer to a low-actinic separator with the aid of 10 mL of water, adding the 10 mL of rinsings to the separator. Add 200 mg of hydroxylamine hydrochloride, swirl to dissolve, immediately add 5.0 mL of Diaminonaphthalene Solution, insert the stopper, and swirl to mix. Allow the solution to stand at room temperature for 100 minutes. Add 5.0 mL of cyclohexane, shake vigorously for 2 minutes, and allow the layers to separate. Discard the aqueous layer, and centrifuge the cyclohexane extract to remove any dispersed water. Determine the absorbances of the cyclohexane extracts of the Test Solution and the Standard Solution in a 1-cm cell at the wavelength of maximum absorbance at about 380 nm, with a suitable spectrophotometer, using the cyclohexane extract of the reagent blank as the blank, and compare the absorbances: the absorbance of the Test Solution is not greater than that of the Standard Solution where a 200-mg test specimen has been taken, or is not greater than one-half that of the Standard Solution where a 100-mg test specimen has been taken.


“End of Document”

error: Content is protected !!