Pharmaco Guide

Categories
Training

Stability Studies – an overview

Stability Studies – an overview

  • Stability: Fundamentals 

The ability of a pharmaceutical product to retain its 

properties within specified limits throughout its shelf life. 

Aspects of stability that are to be considered include: 

Physical, Chemical, Microbiological & Biopharmaceuticals. 

 It is It is a study on the evidence on how the quality of a drug substance or drug products varies with time under the influence of variety of environmental factors such as Temperature, Humidity and Light. 

  • Objective – why stability 
  • To provide evidence on how the quality of a drug substance / product varies with the influence of variety of environmental factors such as temperature, humidity & light 
  • To recommend storage conditions 
  • To recommend retest period 
  • To assign shelf life 
  • To review the product quality 
  • To fulfill the regulatory requirement for dossier submission 
  • Why is stability testing an important issue ? 
  • In order to demonstrate that: 
  • the clinical effect 
  • the patient safety 
  • the quality 

of the drug is maintained during its maximal time of storage and intended use.


Starting a Study 

Contents of a stability protocol 

Setting the ‘start date’ for a stability study 

Determining the ‘due dates’ for a stability study protocol The initial certificate of analysis at to for a stability study SOP Control 

Format and layout of standard operating procedures Indexing procedure for stability studies 

Index for stability sops 

Study Parameters 

Setting limits for check specifications in a stability study. Number and size of batches for stability testing. 

Sampling 

Number of samples required for performing stability tests Labeling of stability study samples 

Storage configuration of samples in a stability environment 

Storing the stability study samples under controlled conditions prior to analysis 

Study Conditions 

Intervals and climatic conditions for a development stability study Intervals and climatic conditions for a pivotal/bioequivalence stability study 

Intervals and climatic conditions for a validation/pm stability study Placing the reference listed drug (RLB) on stability 

Packaging procedures 

Sampling and testing of pivotal batches – tablet & capsule dosage forms. Sampling and testing of pivotal batches – powder & syrups for reconstitution. 

Container systems 

Container-liner-closure systems for a stability study. 

Certification of a container-liner-closure system. 

Test methods 

The control of analytical methods #’s and edition #’s in stability documentation 

Test results 

Reporting test results of a stability study. 

Procedures for handling abnormal or OOS results in a stability study. 

Audit and Review Raw Data 

Auditing stability data in laboratory notebooks 

Cross-referencing laboratory notebooks with computerized stability documentation 

Chart Control 

Recording stability study climatic conditions 

Review and control of temperature and humidity recording charts 

Validation and Sanitation 

Periodic revalidation of climatic rooms and chambers 

Sanitation and housekeeping requirements of climatic chambers 

Corrective Action 

Fault correcting procedures (after breakdowns) during a Stability Study Emergency procedures during a stability study 

Stopping a Study 

Conditions for stopping a stability study. 

Self Inspection 

Self inspection procedures in a stability department. 

Job Description and Training 

Job description of stability department personnel 

Using stability SOPs and compliance program as stability training tools. The Do’s and Don’ts of a stability study – a department training tool. 

Stability department compliance staff training 

Reviewing Documentation 

Review and auditing stability study documentation. 

The layout and format of a regulatory stability report (a filed report) 

Documentation requirements for a stability study – contents 

of a stability dossier 

Closing a Study 

Accepting and signing-off a completed stability study. 

Stability protocol – contents: 

  • Name of the product
  • Batch size, type of batch and number of batches 
  • Source of API 
  • Type, size, source of containers and closures 
  • Storage condition 
  • Sampling schedule 
  • Container storage orientation 
  • Test parameters 
  • Test methods 
  • Acceptance criteria
    • Stages of stability : 
    • Pre-formulation / pre-experimental stability. 
    • Formulation / experimental stability 
    • Pilot / post experimental stability 
    • Production / commercial stability 

    Stability studies during product life-cycle 

    Guidelines for Stability Testing: 

    • ICH guidelines on Stability testing of new drug substances 

    and drug products 

    • USFDA guidelines on Stability testing 
    • CPMP guidelines on stability 
    • WHO guidelines on stability testing of pharmaceutical products 

    Abbreviations – commonly used 

    • ICH: International Committee for harmonisation 
    • CPMP: Committee for proprietary Medicinal Products 
    • EMEA: European Agency for the evaluation of Medicinal products 
    • EFPIA: European Federation of Pharmaceutical Industries & associations 
    • FDA: Food and Drug Administration 
    • PhRMA: Pharmaceutical Research and Manufacturers of America 
    • MHLW: Ministry of Health, Labour Welfare 
    • JPMA: Japan Pharmaceutical Manufacturers Association 

     Global climatic zones:

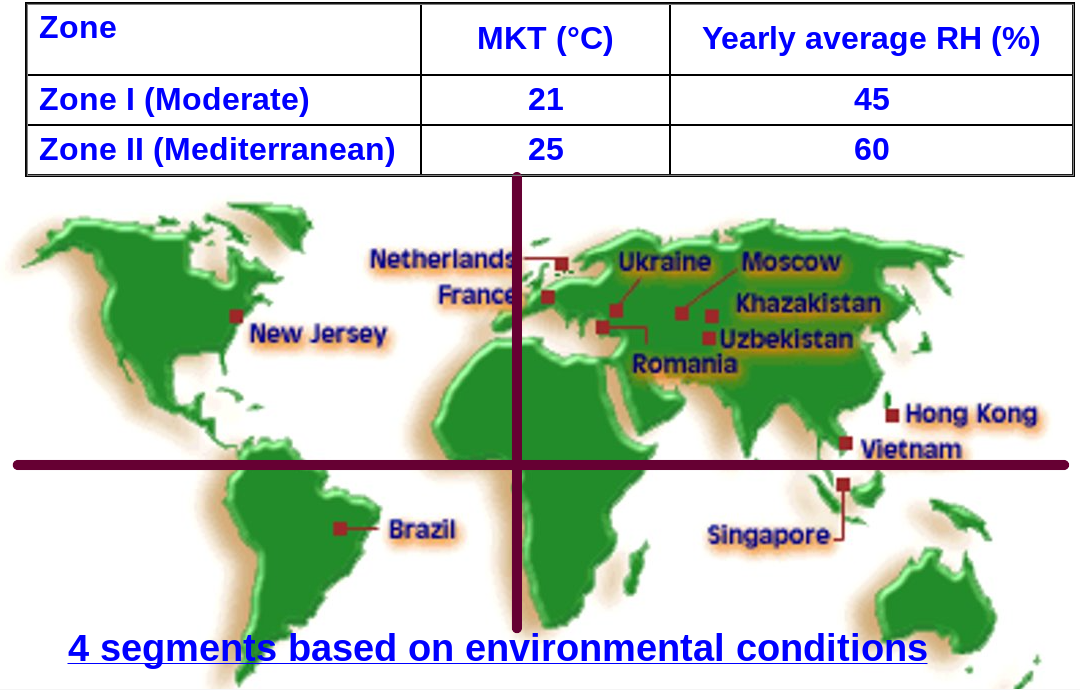
    Distribution of nations into different climatic zones: 

    Region Zones I & II Zones III & IV 
    European All countries  
    American Chile, Canada, United States Brazil, Jamaica, Venezuela 
    Asian 

    China, Japan, 

    Turkey 

    India, Philippines, 

    Sri Lanka 

    African 

    South Africa, 

    Zambia, Zimbabwe 

    Botswana, Ghana, Uganda 
    Australian / Oceanic Australia, New Zealand Fiji, Papua – New Guinea 

    Q1A : Stability Testing of New Drug Substances & Products. 

    Q1B : Stability Testing : Photostability testing of New Drug Substances  & Products. 

    Q1C : Stability Testing for New Dosage Forms. 

    Q1D : Bracketing & Matrixing Designs for Stability Testing of Drug Substances & Products. 

    Q1E : Evaluation of Stability Data. 

    Q1F : Stability Data Package for Registration Applications in Climatic Zones III & IV. 

    Q3A : Impurities in New Drug Substances. 

    Q3B : Impurities in New Drug Products. 

    Q3C : Impurities: Guideline for Residual Solvents. 

    Q3C(M): Impurities: Guideline for Residual Solvents (Maintenance). 
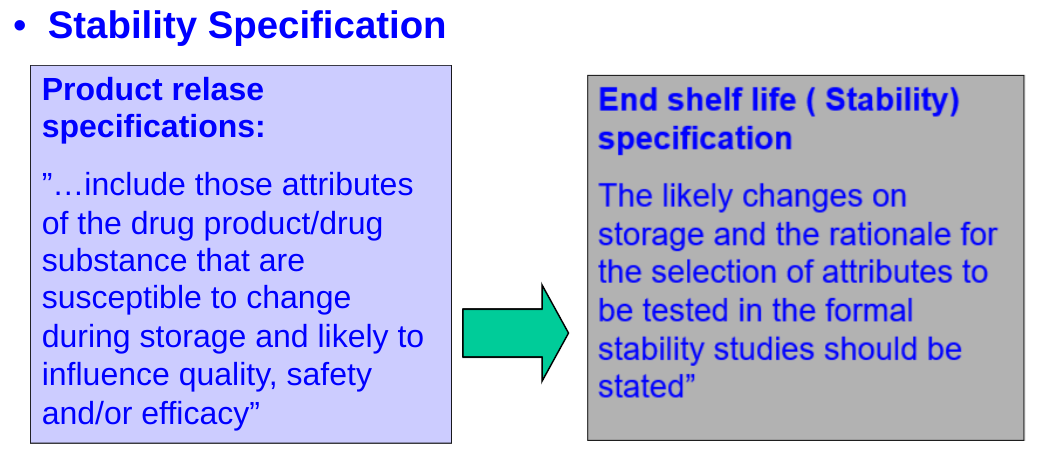
    Specifications : 

    • List of tests. 
    • Testing procedure. 
    • Acceptance criteria (at the time of release / shelf life). 
    • Reference standards. 
    • In-process tests. 
    • Physical tests such as particle size distribution 
    • Parametric releases. 
    • Various decision trees 
    • Impurities 
    • Micro limits. 

     The testing should cover as appropriate : chemical, physical, biological & microbiological parameters. Validated analytical method should be adopted. 

    • Stability Testing Frequency 
    • Long Term : First year : Every 3 months. 

    Second year : Every 6 months. 

    Thereafter : Annually. 

    • Intermediate : 0, 3, 6, 9, 12 months. 
    • Accelerated : 0, 3, 6 months.

      Storage Condition :  General case: 


      Study Storage condition Minimum time period covered by data at submission 
      Long Term 25 20C / 60 5% RH 12 months 
      Intermediate 30 20C / 65 5% RH 6 months 
      Accelerated 40 20C / 75 5% RH 6 months 

      Any “significant change” occurs during 6 month accelerated study, additional testing at intermediate storage should be conducted. The initial application should include a minimum of 6 moths data from 12 month study of intermediate storage condition. 

      “Significant change” for a drug substance is failure to meet specification. For drug product, it is given separately. 

      Storage Condition : 

      Drug Substance / Drug Product intended for storage in refrigerator : 


      Study 


      Storage condition 

      Minimum time period covered 

      by data at submission 


      Long Term 


      5 30C 


      12 months 


      Accelerated 


      25 20C / 60 5% RH 


      6 months 

       If “significant change” occurs between 3 & 6 months of 

      accelerated study, data on long term study should be submitted. 

      If “significant change” occurs within 3 months of accelerated study, it is unnecessary to continue further testing. 

      iii. Storage Condition Drug Substance / Drug Product intended for storage in freezer : 


      Study 


      Storage condition 

      Minimum time period covered 

      by data at submission 


      Long Term 


      – 20 50C 


      12 months 

       There is no accelerated study for above case. 

      Drug substance intended for storage below – 20 0C should be treated case by case. 

      • COMMITMENT 
        • If the submission does not include stability data on production batches, a commitment should be made to place the first 3 production batches on long term studies during the proposed shelf life and accelerated studies for 6 months. Initial long-term data on primary batches may not cover the proposed shelf life granted at the time of approval.
          • COMMITMENT 
          • Initial long-term data on primary batches may not cover the proposed shelf life granted at the time of approval. 


          • Commitment is made to continue the post approval studies in order to 

          firmly establish the shelf life. 


          • If the submission includes data from studies on less than 3 production batches, a commitment is made to continue the long term studies during the proposed shelf life and place additional production batches to make a total of at least 3 on long-term studies through the proposed shelf life. 


Facebook
Twitter
LinkedIn
Categories
QC SOP

Sampling, Analysis and Release or Rejection of Raw Materials

Facebook
Twitter
LinkedIn
Categories
QC SOP

Cleaning of Glassware’s used in Quality Control Laboratory

Cleaning of Glassware’s used in Quality Control Laboratory

  1. Objective:
    To lay down the procedure for Cleaning of Glassware’s used in Quality Control Department.
  2. Scope:
    This procedure is applicable for cleaning of unclean Glassware’s used for analysis in Quality Control Department. 
  3. Responsibility: 
  1. Quality Control Department: To prepare and review the SOP. To follow the procedures laid down for Cleaning of Glassware’s used in Quality Control Department as per this SOP. 
  2. Quality Assurance Department: To review and approve the SOP and Annexures. 

    4. Accountability:
    Head Quality Control Department, Head Quality Assurance Department 

    5. Procedure: 

Sr. No. 

Procedure 


  1.  

Safety Precautions: 

  1.  

Always wear Personal Protective Equipments such as safety goggles, gloves, masks during washing of glassware’s. 


  1.  

Do not use brushes that are so worn that the spine hits the glass as a result serious scratches may result and scratched glass is more prone to break during analysis. 


  1.  

Inspect the glassware before each use and discard if scratched on inner surfaces, chipped, cracked or damaged in any way. 


  1.  

Do not drop glassware’s from height. 


  1.  

Do not bang glassware’s to sink or tap. 


  1.  

Rubber sink and counter mats can help reduce the chance of breakage and resultant injury. 


  1.  

Visually check glassware’s for any cracks before washing. Broken glassware’s may cause injury. 


  1.  

Protect cleaned glassware’s from dust by placing them in dust free cabinets and cover the glassware with stopper, foil, paraffin or by keeping in tilt position.  


  1.  

Do not collect or touch broken glass pieces with bare hands. It can cause injury. Send the broken glassware for destruction. 


  1.  

Do not shake glassware’s too much vigorously as it may get cracks by pressure. 


  1.  

Do not keep alkaline liquids in volumetric flasks or burettes for longer time as a result stoppers or stopcocks may get stick. 


  1.  

Ensure that the soap has been thoroughly removed from the glassware’s. If soap comes in contact with acid, a film of grease may be formed. 


  1.  

Never use strong alkaline products and hydrofluoric acid as cleaning agents. These materials dissolve glass, leading to damage and eventual breakage. 


5.2 

General Procedure: 

  1.  


Wear safety goggles, gloves, masks before starting the washing of glassware’s. 


  1.  

Wash the glassware’s as soon as possible after use, so that residue can be removed easily with general detergent (non ionic) solution. 


  1.  

Drain off any non hazardous contents present in flasks, beakers, test tubes etc. in the sink and hazardous contents in the waste containers and then rinse the glassware’s with tap water before transferring them into soap solution. 


  1.  

Drain off hazardous contents from the flask, beakers or any other glassware before giving it for washing. 


  1.  

Remove the markings of pen marker on glassware’s with the methanol/IPA. 


  1.  

Remove the silicon grease on glassware’s with Acetone or use fuming sulphuric acid for about 30 minutes and then rinse with purified water. 


  1.  

Gently scrub inner and outer portions of glassware’s with scrubber or nylon brushes. If thorough cleaning is not possible immediately, soak the glass wares in water and keep. 


  1.  

If adhesive material is not removed or dissolved in water then soak the glass wares in detergent solution (0.1% SLS) or any other soap solution till adhesive material is removed or dissolved. 


  1.  

Preparation of 0.1% SLS: – Dissolve 1gm of SLS in 1000ml water. (Quantity can be prepared as per requirement). 


  1.  

During washing all parts of glassware’s should be gently scrubbed with nylon brush.  


  1.  

Rinse the glassware’s with running tap water; allow the water to run into and over the glassware’s for short time until no foam of soap is produced on shaking. Shake and empty at least six times with tap water. 


  1.  

All the glassware’s should be finally rinsed with purified water twice and kept in tilted position to drain off water completely.  


  1.  

Dry the glass wares in the glassware drying oven at 60 °C ±5°C in tilt Position. Do not dry the glass wares more than the above mentioned temperature limit as it may alter calibration of the glassware’s. 


  1.  

New glassware’s should be soaked in 1% solution of hydrochloric acid or nitric acid for about 5-6 hours before washing as new glassware’s are slightly alkaline in reaction. 


  1.  

If glassware becomes unduly cloudy  or dirty or contains coagulated organic matter then glass wares should be given chromic acid treatment as follow:- 


  1.  

Chromic acid solution: Dissolving 84 gm of chromium trioxide in 700 ml water and add slowly, with stirring 400 ml of sulphuric acid. (While preparing solution use personal protective equipments such as goggles, gloves, a mask as chromic acid is classified as a carcinogen).  OR 


  1.  

Dissolving 200 gm of Sodium Dichromate in about 100 ml water, cooling in ice-bath and adding slowly to it, with stirring, 1500 ml of sulphuric acid. 


  1.  

Pour the few ml of chromic acid solution on dirty glassware’s and leave them for minimum 15 minutes.  


  1.  

Add small amount of potable water with shaking. Rinse several times with water or allow to keep in water for about one hour as the chromic acid is highly acidic in nature and finally rinse with purified water twice. 


  1.  

Dry the washed glassware’s in the glassware drying oven at 60 °C ±5°C in tilt Position. 


  1.  

Use the washed glassware within one week of the washing. After one week re-wash the same glassware’s before use even if they are not used. 


  1.  

Store the washed and dried glassware in a designated and clean cupboard with proper labelling. 


5.3 

For washing burettes, separating funnels:  

  1.  

Remove the stopcock or rubber tip and wash with water/soap solution. Be careful that the tips of the burettes, funnels should not hit the sink or the water tap.  


  1.  

Rinse it under running tap water until all the dirt is removed. Allow the water to run into and over the burettes, separating funnels for short time and then rinse them with purified water.  


  1.  

Shake and empty at least six times with tap Water and two times with purified water. Wash the stopcocks or rubber tips separately. Dry separating funnels and burettes in the glassware drying oven at 60 °C ±5°C. 


5.4 

For washing Pipettes:  

  1.  

Place the pipettes in the jar containing water or soap solution placing the tips downward immediately after use.  


  1.  

Rinse them with tap water before placing them in jar. Ensure that the water level in the jar is high enough to immerse the maximum portion of the pipettes.  


  1.  

Do not drop them into the jar. This may break the tips and render the pipettes useless for accurate measurements.  


  1.  

At the time of washing, rinse them under running tap water until all the dirt is removed. Allow the water to run into and over the pipettes for short time and then rinse them with purified water.  


  1.  

Shake and empty at least six times with tap Water and two times with purified water. Dry them in the glassware drying oven at 60 °C ±5°C. 


   5.5 

Glassware Cleaning Validation:- 

  1.  

Design Glassware Cleaning Validation protocol before starting the study.  


Glassware Cleaning Validation for API/Product Residue:- 

  1.  

Choose an available “difficult to clean” API 


  1.  

A standard solution of the API shall be prepared as described in the testing method (Refer STP/GTP). 


  1.  

Select the glassware’s in the laboratory such a way that it will cover minimum and maximum capacity which is generally used for standard/sample preparation. 

For Example refer below Table:-  

Glassware Name 

Capacity (ml) 

Volumetric Flask 

5ml, 10ml, 25ml, 50ml, 100ml, 250ml, 500ml. 

Conical Flask 

50ml, 100ml, 250ml, 500ml. 

Volumetric Pipette 

1ml, 2ml, 5ml, 10ml, 25ml, 50ml. 

Graduated pipette 

1ml, 2ml, 5ml, 10ml, 25ml, 50ml. 

Test Tubes 

5ml, 10ml, 20ml, 50ml, 100ml. 


  1.  

Take each type one glassware as mentioned above. 

(Note: – Actual glassware’s capacity may vary depend upon the availability glassware’s in the laboratory.)  


  1.  

Each of the selected volumetric flasks/conical flasks/test tubes shall be filled to about 10% of its nominal volume with the Standard solution, close and shake such a way that the inner walls of the flasks will be covered by the liquid. Then Glassware’s shall be emptied and allowed to dry. 


  1.  

Each of the selected pipettes shall be filled with its nominal volume with the Standard solution such a way that the inner walls of the pipettes will be covered by the liquid. Drain the liquid from pipette and allow to dry. 


  1.  

Gently scrub all parts of glassware’s with nylon brush under tap water.  


  1.  

Rinse the glassware’s with running tap water; allow the water to run into and over the glassware’s. Shake and empty the Glassware’s at least six times with tap water. 


  1.  

All the glassware’s should be finally rinsed with purified water twice and kept in tilted position to drain off water completely.  


  1.  

All the cleaned Glassware’s shall then filled and shake with the diluent solution used for the preparation of the Standard Solution.  


  1.  

Take the diluent solution from the Glassware’s and analyse as per testing method of the API/Product used. 


  1.  

Take the readings of standard solution and residual solution. 


  1.  

Calculate the residual amount of API for each cleaned Glassware’s by referring STP/GTP. 


  1.  

Acceptance Criteria:- 

Traces of the API should not be more than 0.1% of standard solution.  


  1.  

If above criteria is not meeting for any cleaned glassware then increase the rinsing time and perform Glassware cleaning validation again. 


Glassware Cleaning validation For Detergent/Soap Solution Residue:- 

  1.  

Soak the glass wares in detergent solution (0.1% SLS) or any other soap solution for about 30 minutes. 


  1.  

Preparation of 0.1% SLS: – Dissolve 1gm of SLS in 1000ml water. (Quantity can be prepared as per requirement). 


  1.  

Select the glassware’s in the laboratory such a way that it will cover minimum and maximum capacity which is generally used for standard/sample preparation. 

For Example refer below Table:-  

Glassware Name 

Capacity (ml) 

Volumetric Flask 

5ml, 10ml, 25ml, 50ml, 100ml, 250ml, 500ml. 

Conical Flask 

50ml, 100ml, 250ml, 500ml. 

Volumetric Pipette 

1ml, 2ml, 5ml, 10ml, 25ml, 50ml. 

Graduated pipette 

1ml, 2ml, 5ml, 10ml, 25ml, 50ml. 

Test Tubes 

5ml, 10ml, 20ml, 50ml, 100ml. 


  1.  

Gently scrub all parts of glassware’s with nylon brush under tap water.  


  1.  

Rinse the glassware’s with running tap water; allow the water to run into and over the glassware’s for short time until no foam of soap is produced on shaking. Shake and empty at least six times with tap water. 


  1.  

All the glassware’s should be finally rinsed with purified water twice and kept in tilted position to drain off water completely. 


  1.  

All the cleaned Glassware’s shall then filled and shake with the water (diluent solution) used for the preparation of the 0.1% SLS.  


  1.  

Take the water (diluent solution) from the Glassware’s and analyse as per testing method  


  1.  

Take the readings of 0.1% SLS solution/Soap solution and residual solution. 


  1.  

Calculate the residual amount of SLS/Soap solution for each cleaned Glassware’s by referring STP/GTP. 


  1.  

Acceptance Criteria:- 

No traces of the SLS/Soap solution should be detected.  


  1.  

If above criteria is not meeting for any cleaned glassware then increase the rinsing time or use different detergent and perform Glassware cleaning validation again. 


  1.  

The Glassware Cleaning Validation protocol shall contain the following information; 

Glassware Cleaning Validation protocol cover page 

Protocol Pre-approval sheet 

Introduction 

Objective 

Scope 

Responsibilities 

Definition and Abbreviation 

Procedure 

Observed Deviation/OOS 

Attachments 

References  

Summary and Conclusion 

Protocol Post-Approval sheet 


  1. Definitions / Abbreviations: 
  1. Abbreviations : 

Abbreviation 

Expansion 

SOP 

Standard Operating Procedure 

QC 

Quality Control  

QA 

Quality Assurance  

gm 

gram 

ml     

Millilitre 

± 

Plus or minus 

°C     

Degree centigrade 

% 

Percentage   

SLS 

Sodium Lauryl Sulfate 


Facebook
Twitter
LinkedIn
Categories
QC SOP

Cleaning and Operation of Sampling Booth

Cleaning and Operation of Sampling Booth

  1. Objective:
     To lay down the procedure for Cleaning and Operation of Sampling Booth.  
  2. Scope:This procedure is applicable for Cleaning and Operation of Raw Material Sampling Booth         used for Raw Material Sampling. 

  3. Responsibility: 
  1. Quality Control Department: To prepare and review the SOP. To follow the procedures laid down for Cleaning and Operation of Raw Material Sampling Booth in Quality Control Department as per this SOP. 
  2. Quality Assurance Department: To review and approve the SOP and Annexures. 
  3. Engineering Department: To carry out preventive maintenance as per schedule and procedure defined. 
  1. Accountability: 

            Head Quality Control Department, Head Quality Assurance Department 

  1. Procedure: 

Sr. No. 

Procedure 


  1.  

Safety Precautions: 

  1.  

Always use personal protective equipments such as nose masks and hand gloves while sampling, operation and cleaning of sampling booth. 


  1.  

Never stand in front of the RLAF when Ultraviolet light is ON as UV exposure can cause damage to eyes, cell damage, skin itching etc. 


  1.  

Do not perform cleaning activity when UV light is ON. 


   5.2 

Operation of Sampling Booth: 

  1.  

Ensure the cleaning of sampling booth is satisfactory and AHU is in running condition. Use 70% IPA for cleaning before starting the activity. 


  1.  

Switch ‘ON’ the RLAF unit after cleaning the unit and then switch ‘ON’ UV light of the sampling RLAF and pass box. Run them for minimum 30 minutes for disinfection.  


  1.  

After 30 minutes, switch OFF the UV light of the sampling RLAF and Pass box and note down burning hours in annexure. Start the air flow and check the differential pressure of RLAF on magnehelic gauge is between 10 mm – 20 mm as well as check the temperature and humidity maintained at 25±2oC and 55±5% in the area respectively.  


  1.  

In case, if the differential pressure or Temperature/Humidity conditions are not meeting the requirements, then intimate the Engineering Department and Head Quality Control.  


  1.  

Perform sampling of raw materials as per SOP ‘Sampling of Raw Materials” under RLAF. 


  1.  

Transfer all the containers/bags/drums from the quarantine area or Under Test area one at a time through the pass box into the sampling booth, draw the sample and return to the Under Test area after completion of sampling. 

 
  1.  

All the used equipment’s; accessories shall be removed from the sampling booth after use for cleaning. 

 
  1.  

Switch off the RLAF after 15 minutes of completion of sampling activity. 

 
  1.  

 Update the “Usage and Cleaning Record of Raw material Sampling Booth” as per define Annexure. 


  1.  

Label the sampling booth as “To be Cleaned” or if cleaning activity is going on, then label as “Under Cleaning” and start the cleaning activity. 


   5.3 

Cleaning Procedure of Sampling Booth: 


  1.  

Switch ‘OFF’ the RLAF before starting the cleaning activity. 


  1.  

Ensure that all documents and labels and accessories of previous material are removed from sampling booth. 


  1.  

Clean spilled dry powder or waste with soft brush or vacuum cleaner and collect in the waste bin. 


  1.  

Wipe the inside part as well as outside parts of the sampling booth properly in each and every corner with soft clean lint free dry cloth followed by wet cloth with water and finally wipe with wet cloth dipped in 70% IPA solution. 


  1.  

Wipe the floor and walls of sampling booth and pass box with clean soft lint free cloth, followed by wet cloth with water and finally with disinfectant solution such as dettol/savlon. 


  1.  

Clean the UV light and ordinary tube lights with soft lint free cloth.  


  1.  

After completion of the cleaning activity update the “Usage and Cleaning log of Sampling Booth” as per format number QC/003/F01 and label the sampling booth as follows:  


  1.  
After completion of the cleaning activity, switch ‘ON’ the UV light of Both Sampling RLAF and pass box for 30 minutes. Record in Annexure. 


  1.  

Cleaning of sampling booth shall be carried out at the start of the shift and after completion of sampling activity. 


5.4 

Validation of RLAF: 

5.4.1 

Frequency: Once in a year 

5.4.2 

Validation of RLAF shall be performed by external agency. 


5.4.3 

For validation refer SOP “Procedure for validation of LAF/RLAF” for parameters and acceptance criteria. 


5.5 

UV Efficacy Study of UV light tube in Sampling RLAF and Pass box 

5.5.1 

Frequency: Half Yearly 


5.5.2 

Perform Efficacy test of UV light Study as per define SOP 


     5.6 

Preventive Maintenance: 

5.6.1 

Perform the preventive maintenance as per define frequency. 


  1. Definitions / Abbreviations :   
  1.       Definitions : 
  1. Quality Control Associate: Analyst, Supervisor, Executive of Quality Control Department or any personnel trained to perform duties as per this SOP. 
  1. Quality Assurance Associate: Executive of Quality Assurance Department or any personnel trained to perform duties as per this SOP. 
  1. Engineering Associate: Officer, Executive of Engineering Department or any personnel trained to perform duties as per this SOP.  
  1. Breakdown: Any activity leading to operation of instrument other than the set parameters or unusual sound or vibration observed in the instrument. 
  1. Preventive Maintenance: Maintenance activity performed to ensure that the instrument will function smoothly and to avoid breakdowns. These activities are performed as per predefined frequency. 
  1. Principle of Sampling booth:  

Sampling booth is used to control hazardous emissions of powder, dust or vapour during sampling, without risk to the operator or environment. They are constructed from stainless steel in fully ducted designs. The reverse laminar flow booth is made from stainless steel. A negative pressure inside the booth prevents the escape of fine powder from the work area towards the external environment. Downward airflow provides full protection to operator and product. It minimizes the risk of contaminating the work zone ensuring health and safety of people working with the chemical/powder. Reverse laminar air flow operates on the principle of providing containment of contaminated air by air movement. Pre filters capture airborne contaminants in the rear of the room or hood, and the velocity of the air entering the filters is accelerated to reduce the number of particles that recirculation into the room.  

  1.      Abbreviations : 

Abbreviation 

Expansion 

QC 

Quality Control  

QA 

Quality Assurance  

SOP 

Standard Operating Procedure 

PVC 

Poly Vinyl Chloride 

RLAF 

Reverse Laminar Air Flow 

LAF 

Laminar Air Flow 

± 

Plus or minus 

% 

Percentage 

oC 

Degree Celsius 

mm 

millilitre 

AHU 

Air Handling Unit 

UV 

Ultra Violet 

IPA 

Isopropyl Alcohol 

Facebook
Twitter
LinkedIn
Categories
QC SOP

Entry Exit Procedure in Quality Control Department

Entry Exit Procedure in Quality Control Department

  1. Objective:  
    To lay down the procedure for Entry and Exit in the Quality Control Department. 
  2. Scope:
    This procedure is applicable for Entry and Exit of working personnel and visitors in the Quality Control Department. 
  3. Responsibility:  
  1. Quality Control Department: To prepare and review the SOP. To follow the procedures laid down for Entry and Exit of working personnel and visitors in Quality Control Department as per this SOP. 
  2. Quality Assurance Department: To review and approve the SOP and Annexure. 
  3. Accountability:
    Head Quality Control Department, Head Quality Assurance Department 
  1. Procedure: 

Sr. No. 

Procedure 


  1.  
  1. Entry and Opening Procedure of the Department: 
  1.  

Person entering first in the Quality Control Department should collect the keys of the Department from the keyboard provided in the change room corridor. 


  1.  

Enter in the respective change rooms (Gents OR Ladies). 


  1.  

Keep the personal belongings in the lockers provided with lock and key. 


  1.  

Remove street footwear and keep them on the racks provided on the cross over bench. 


  1.  

Cross over the bench. Wear the company footwear’s dedicated to every individual kept on the racks of the cross over bench. 


  1.  

Collect and wear the clean apron from the cupboard provided in the change room. 


  1.  

Sanitize the hands with the sanitizer provided in the change room and enter through the door. 


  1.  

Person entering first with Department keys should check that the main door of the Department is in locked condition. If not, immediately bring it to the notice of the Quality Control Head, Administration Head and Security personnel. 


  1.  

Open the lock of the main door and ensure that no obnoxious smell or any other foul odour or smell is emitted from the Department. If any obnoxious smell observed, then do not enter into the Department, immediately bring it to the notice of the Quality Control Head, Administration Head and Security personnel. 


  1.  

Switch ‘ON’ the Department lights and air conditioners. 


Sr. No. 

Procedure 


  1.  

Before starting the work, ensure that the cleaning activities are completed in the presence of the house keeping personnel/Supervisor.   


  1.  

Verify AHU or HVAC are in working conditions by checking the temperature and humidity. If not intimate the Engineering Department accordingly. 


   5.2 

  1. Exit and Closing Procedure of the Department: 
  1.  

At the end of the shift check that the instruments/equipment’s which are not in use are switched OFF and the work benches are cleaned before leaving the Department. 


  1.  

Ensure the regulator valve of LPG cylinder in microbiological section is closed. 


  1.  

Verify that all chemicals, reagents, liquid solvents are properly closed and kept in their respective places after use and all water supply taps are closed. 


  1.  

All reference books should be placed in their designated places in the cupboard. 


  1.  

Ensure lights are Switch ‘OFF’ which are not required. 


  1.  

The person leaving the Department last should cross check that all the above steps have been followed and lock the main door of the Department.  


  1.  

After leaving the Department enter into the respective change rooms, remove company footwear’s, apron and keep them in the designated places. 


  1.  

Cross over the bench, collect your personal belongings from the lockers, wear your street footwear and exit from the change room. 


  1.  

Keep the keys of the Department in the keyboard provided in the change room corridor. 


    5.3 

Entry Exit of Visitors in the Department: 

  1.  

All visitors should be accompanied with company employee in Quality Control Department. 


  1.  

Visitors should enter through change room wearing visitor apron and shoe cover or company footwear provided in the change room cupboard. 


  1.  

At the time of exit from the Department visitors should enter into the change room, remove apron, shoe covers or company footwear and keep them in the designated places.  


  1.  

Cross over the bench, wear your street footwear’s and exit from the change room. 


  1. Definitions / Abbreviations: 


  1.     Abbreviations: 

Abbreviation 

Expansion 

SOP 

Standard Operating Procedure 

QC 

Quality Control  

QA 

Quality Assurance  

AHU   

Air Handling Unit 

No. 

Number 

HVAC 

Heating, Ventilating and Air Conditioning 

LPG    

Liquid petroleum Gas 

Facebook
Twitter
LinkedIn
error: Content is protected !!